

Installing OpenCV 3.0 and Python 3.4 on Windows
For the rest of this post, I will show you how to compile and install OpenCV 3.0 with Python 3.4+ bindings on Windows.
Step 1
In order to use python 3.4+ with openCV, the first step is to build our own version of openCV using CMake and Visual Studio (I’m using Visual Studio 2013 Express for Desktop), since the prebuilt binaries in the openCV website includes python 2.7 libraries and not the 3.4+ libraries. So, if you have not done so, install these applications below:
Step 2
To use python with openCV, aside from installing the core python packages, you also need to install Numpy (a python array and matrices library). You can install them separately from their own websites. However, I like to use python packages from third-parties, specifically Anaconda. These packages give you all the common python libraries bundled with the core python packages. This way, you install everything in a single install. So, the next step is to download and install python+numpy using Anaconda. Download the source from the link below and just install with the recommended install settings.
Note:
It’s good to use virtual environments with python installation just so you can have several versions in one machine for different types of applications you’ll be developing. However, I wont get into this here.
Step 3
Next, we need to download the openCV source. Remember, we need to build a custom openCV build from the source and will not use the prebuilt binaries available for download from the openCV website. There are a couple of ways to download the source, and both of them involve the openCV GitHub webpage.
The easiest way to download the source is to download a zip file containing the contents of the openCV GitHub page. This can be done by pressing the Download Zip button towards the right side of the page. Once your done, extract the contents of the zip file to a folder, for convenience, name it opencv.

If you want to receive updated versions of openCV as they are made by the contributors, you can also clone the source using Git. If you’re familiar with git then you can just use the clone URL as shown in the above image or fork a version of the code for yourself. If you are just getting started with Git, you can use the Clone in Desktop button to copy the updated version of openCV to your local machine. For this to work, you will be asked to download the GitHub Desktop application (you can just follow the instructions from GitHub on how to install this application).
Step 4
Now that all the tools we need to build our very own openCV have been installed, we will start building our openCV binaries. To start the process, create a new folder called build inside your openCV directory (the directory you unzipped/cloned the openCV source to).
We use CMake, the application installed in Step 1, to build the openCV binaries from its source code. So, open CMake-gui from the Start Menu. Now, near the top of the CMake window chose the location of your source code (the openCV directory) and choose the location to build the binaries in (the build folder you just created). I chose to put my openCV directory in C:/opencv, so the settings for me would look like this:

Now, the next thing to do is to configure your build by clicking the Configure button in the CMake window. A pop-up that prompts you to select a compiler will show, choose Visual Studio 12 2013 or the VS version you have installed on your machine. Once chosen, click finish and the configuration process will start. Once its done, the status window should say Configuring done like below:
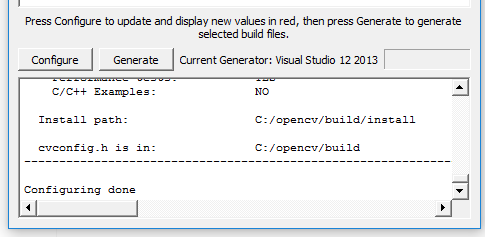
Once the configuration is complete, you will receive fields marked in red in the above display window. If your result is just a long list of fields, make sure to check the Grouped checkbox so that they are nicely grouped like the image below.

First, the WITH field describes the features you want to include inside your openCV binaries. You can include or exclude a feature by using the checkbox in the list. The defaults should be fine, by this is all up to you. If you want to know what each field does, just hover over them and an explanation will pop up.

Next, you need to configure the BUILD field. The BUILD field configures the build method used to build the binaries and also the modules that are to be build into the binaries. The fields in ALL CAPS are the build methods and the rest are the modules to be built. You can keep the methods as is. This is also the case for the modules except for one thing. Since we are building for python 3.4+ we do not need to build for python 2+, therefore it is necessary to uncheck the BUILD_opencv_python2 checkbox. If left checked, this will cause an error during the build process if you do not have python 2+ installed in your machine.

Now, that everything is configured, click the Generate button to create the build filesinside the build folder.
Step 5
Once the build files have been generated by CMake, the next step is to create the binaries using Visual Studio as the compiler. First, go to the your opencv/build directory, then find and open the openCV solution (opencv.sln). Once the solution is open, you should get a solution explorer that looks something like this

Before we build anything, change the build mode to Release instead of Debug. Now,right-click on the Solution ‘OpenCV’ or on ALL_BUILD and select Build. This will start the build process and may take some time.
Once the build is complete, right-click on INSTALL to install openCV-Python on your machine.
Step 6
Once the installation is complete, we need to verify the installation by using python IDLE. Just search for IDLE in the Start Menu and run the program. Type import cv2 in the command line and hit Enter. If no error is found then congratulations, you have just successfully built and installed openCV 3.0 with python 3.4+ bindings on Windows.

Additional Notes:
- You can also check the openCV version you have installed with python by using the cv2.__version__ command (as shown above).
- One error I did receive was that the openCV dll could not be found when calling the command import cv2. This can be solved by adding the Release folder created during the build process to your system path (for me, it was C:\opencv\build\bin\Release)
- In order to code python in Visual Studio, you need to use PTVS (Python Tools for Visual Studio). You can download PTVS from Microsoft’s PTVS page here.


